

On the screen their will be 4 main windows. The top left window is the original clip that has not been edited. The window on the top right is the sequence were the video has been edited. The bottom left window is the project window were you can upload your clips. The bottom right window is the sequence window were you can see how you edited video is laid out.

The bottom left is the project window were you can up load you clips. you can see what is in your video, this is quite handy as most videos look the same you can also get an idea on how to edit the clip.


The top left window which is the original clip help you to know what you have changed compared to the edited clip. As you can see the top right will show the edited clip which I have not done yet

The bottom right window will show you the length of the clips and you can edited how the clip will be linked and you can also edit the audio in this window as well.
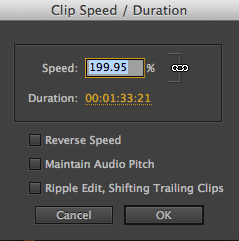
To change the speed of the clip right click on the clip that you want to speed up or slow down then click onto speed duration you can then change the speed by typing it in.


You can also use effects on your clip which can be found in the project window as you can see I have chosen mosaic and dragged it across to the sequence window on to the clip that I wanted the effect on this is the result.

Another effect that i chose to stay with in black and white which is found in the project window as well.

This is the export window which can be found when you click onto file-export-media you can save all of the video or part of it, if you choose to.
No comments:
Post a Comment